August 31, 2010
Makeup Monday: Purple Gaze


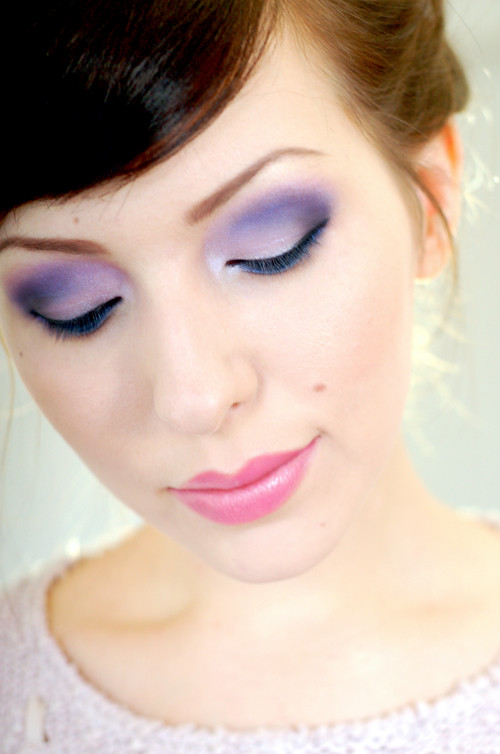
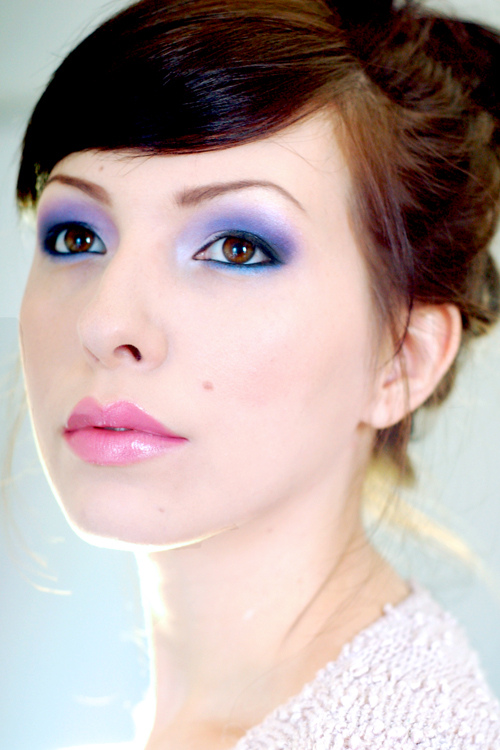
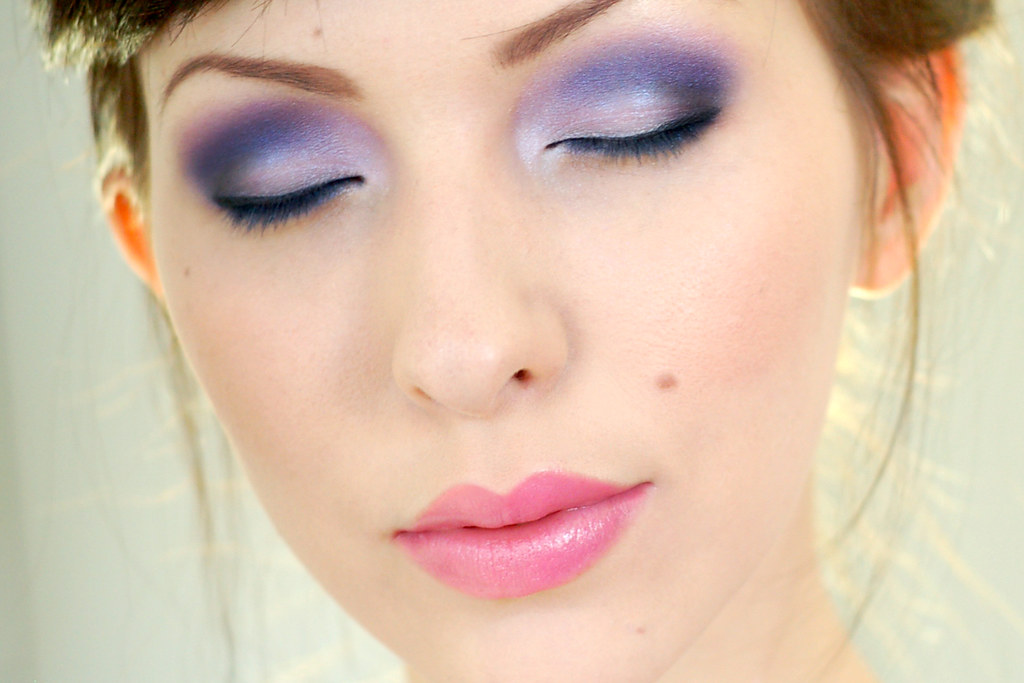
This is a look best suited for night time, but if you ask Kimberly, any of your local drag queens, or me, you can totally wear this in the daytime. Eff your day/night rules! (This is as rebellious as I get.) The trick is – you guessed it! – blending your shadows, both inward and outward. At night, you might be able to get away with poorly applied shadow, because you’re probably in dim light. Daylight is not forgiving. Diffuse those harsh lines, or you’ll look like a mess. Think of it as art. Blend, mix, layer, shade.To see the products and instructions, keep reading!
EDIT: I added an image link to a full size photo of the makeup look – after the jump:
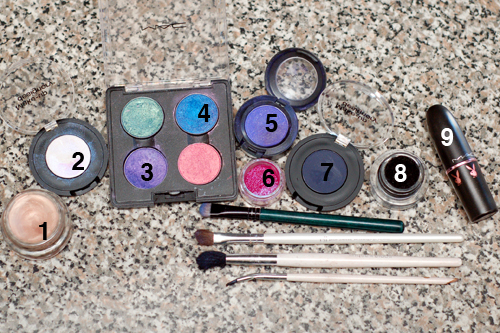
Products used:
1) MAC Bare Study paint pot
2) Make-up Designory Opal Sky eye shadow (c/o MUD)
3) MAC Parfait Amour eyeshadow
4) MAC Freshwater eyeshadow
5) MAC Jeweltone
6) MAC Pink Pearl pigment
7) Make-up Designory smoked sapphire eyeshadow (c/o MUD)
8) MAC blacktrack fluidline
9) MAC Bunny Pink Lipstick (borrowed from Kim)
Brushes (from top to bottom): MAC 239SE (regular shadow brush), ELF defining eye brush (great for crease), Sonia Kashuk fluffy blending brush, Sonia Kashuk bent eyeliner brush
Step one: Apply MAC Bare Study (product #1) all over lids and up to your brows. Just use your fingers – it’s much easier to apply this way. You want this to cover everywhere your eyeshadow will be, so this is a great time to lay out the shape of how you want your eyeshadow.
Step two: Using the fluffy blending brush, apply a shimmery white (product #2 – this one has an opal sheen) to your inner and middle lid, and inner tear duct.
Step three: Using the regular shadow brush, apply a medium purple (product #3) to the crease and just above, and to the outer lid – blend up and out
Step four: Layer a shimmery fuschia over the purple (product #6) and blend the two together. MAC Pink Pearl pigment is similar to their eyeshadow, stars n rockets. It’s a fuschia/purple shimmery color – one of my all time favorites!
Step five: Pack (not swipe) a dark purple eyeshadow (product #5) into the outer crease only, using ELF defining brush
Step six: Pack a dark navy eyeshadow (product #7) into your outer V (the outer lid and very outer lid, which makes a horizontal V). Blend the last two darker shadows like crazy – I prefer to use the defining brush to blend the darker colors first, then go back over it with a little more of the lighter shades (on the outside) with the fluffy brush. This will help to blend it a little more. You want this to look soft, since the colors are severe.
Step seven: Line your top and lower lashes, as well as your waterline, with your eyeliner of choice (I used fluidline (product #8 – with bent eyeliner brush).
Step eight: Layer a bright blue eyeshadow (product #4) over your lower lashline. Reapply liner to your waterline if necessary.
Final step: Mascara! I missed this step. I totally forgot to put mascara on.
I paired this look with Kim’s Bunny Pink MAC lipstick, but you can use whatever shade you prefer. On the cheeks, I applied MAC Petticoat Mineralize Skinfinish, but any pink blush will do!
EDIT: Click the image to see a very large version…I figured this would make it easier to see the detail.
Love love, Keiko Lynn